Support guide · Identify before you call
Find your Sub-Zero model and serial number before the repair
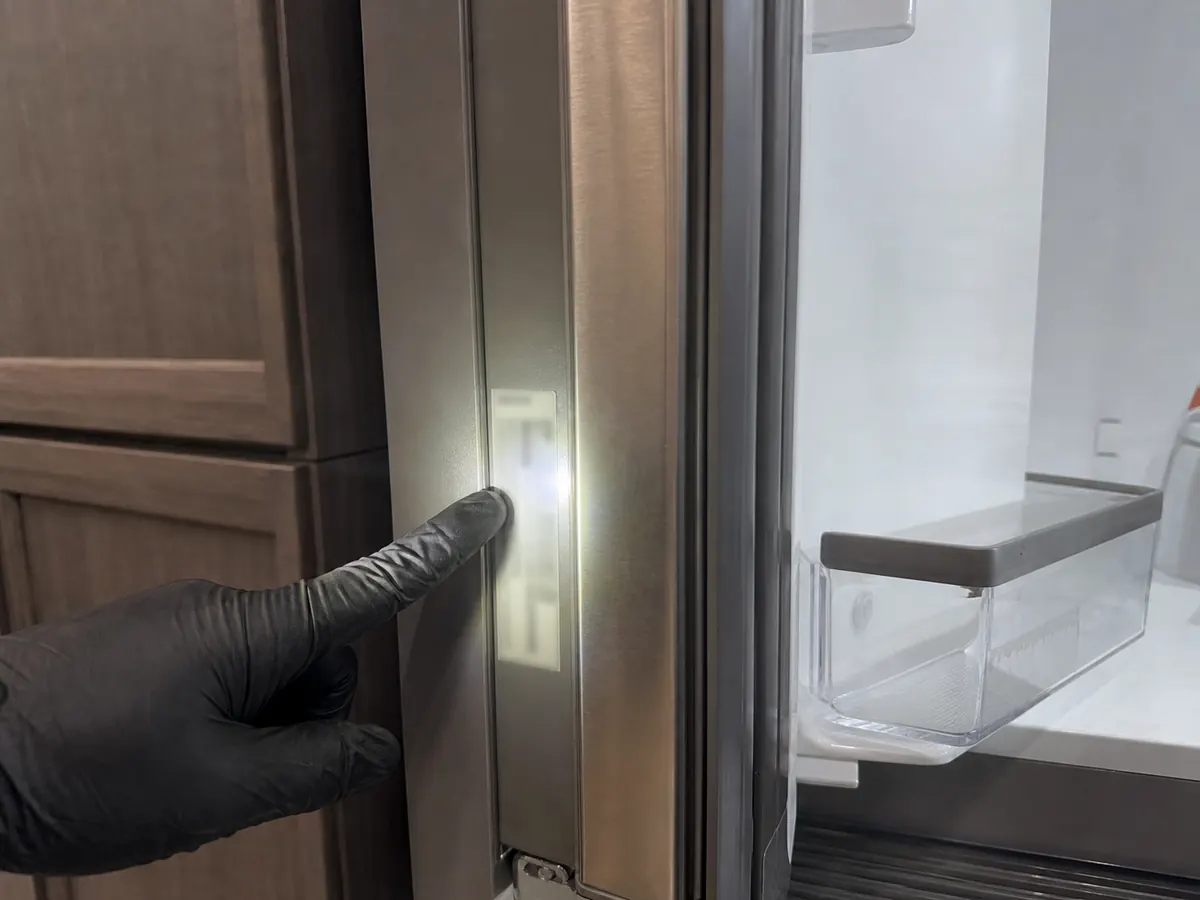
Your Sub-Zero model and serial tag is the single most useful detail to have ready. On built-ins it usually sits inside the fresh-food compartment near the top or behind the upper grille; columns, undercounter drawers and wine units each hide it in a different spot. That number tells a Petaluma technician which fan, gasket, thermistor or control-board revision your unit actually uses — so we arrive with the right OEM part instead of guessing. Book by phone or online and keep the tag location in mind for the on-site diagnosis.
Why this page exists
Plenty of Sub-Zero calls in Petaluma start the same way: a door gasket leak, condensation, or a frost line appears inside a built-in, and the owner wants to know whether it’s serious. In homes around Victoria (near Helen Putnam Park), where warm afternoons push humid kitchen air against an aging seal, that frost line is common — and the fix depends entirely on which gasket profile and door revision your unit carries. We can’t tell that from the model number alone. The serial is what pins it down, which is why the technician confirms the tag before parts are quoted.
The second thing the tag settles is a harder one: a sealed-system suspicion that needs EPA-standard verification. In plain terms, that means we suspect a refrigerant leak or a failing compressor — the cold-making core of the fridge — rather than a simple airflow or defrost fault. We confirm it with gauge readings, frost-pattern photos and electrical checks, never by assuming it from a symptom or topping the system off blindly. The one thing we honestly cannot know before we’re on-site with the unit open is whether the loss of cold is the sealed system or a cheaper fan, gasket or board fault wearing the same disguise — and the serial tells us which spec to test against.
Where the tag hides on each Sub-Zero family
Sub-Zero never put the label in one universal place — it moves by product family and generation. Work through the row that matches your unit. If you can’t reach it safely, stop and let us find it on the visit; cabinetry and refrigerant lines are not worth a scrape.
| Family | Where to look |
|---|---|
| Built-in side-by-side (600-series & classic over-and-under) | Inside the fresh-food compartment, high on the upper-left or upper-right interior wall; if not there, behind the upper grille at the top of the cabinet. |
| Integrated / panel-ready columns (refrigerator or freezer) | On the upper interior side wall just inside the door, or on the top inner edge near the hinge; some carry a duplicate behind the toe-kick grille. |
| Undercounter refrigerator & freezer drawers | Pull the top drawer fully open — the tag is on the interior wall or floor of the cabinet, or on the side of the drawer housing. |
| Dual-zone & single-zone wine storage units | Inside the cabinet on a side wall above the top shelf rail, or along the inner door frame; wine units often pair it with a separate rating plate near the compressor. |
A reliable habit: open the door, look up toward the ceiling of the box first, then sweep the upper side walls, then check behind the lower grille last. The label is a thin foil sticker with a barcode, a Model line and a Serial line — sometimes abbreviated M/N and S/N.
Why the serial number decides your repair
The model number tells us the family; the serial number tells us the revision. Over a long production run, Sub-Zero quietly changed condenser fan motors, gasket profiles, thermistor values and — most importantly — control-board generations within the same model line. Two fridges wearing the identical model badge can need different parts because they left the factory years apart. Order by model alone and you risk a board that won’t talk to the display, or a gasket that won’t seat in the channel.
That’s why a tag photo turns a blind visit into a prepared one. With the serial in hand we check the correct OEM fan, gasket and control-board evidence against your unit, confirm serial-specific evidence on file, and load the part most likely to be needed before we leave the shop. It’s the same discipline behind our core Sub-Zero repair workflow — diagnose, confirm by serial, then quote.
Same model badge, different serial, different part. The number on the tag is what keeps a repair from turning into a second trip.
How to photograph the tag before service
Get a photo we can actually read
- Wipe it first A quick pass removes kitchen film that blurs the barcode.
- Light it Use your phone’s torch at an angle so the foil doesn’t glare back; avoid straight-on flash.
- Fill the frame Get the Model and Serial lines sharp and square — closer than feels necessary.
- Add a wide shot One step-back photo of the whole unit helps us confirm the family if a digit is faded.
Have this checklist ready with the tag
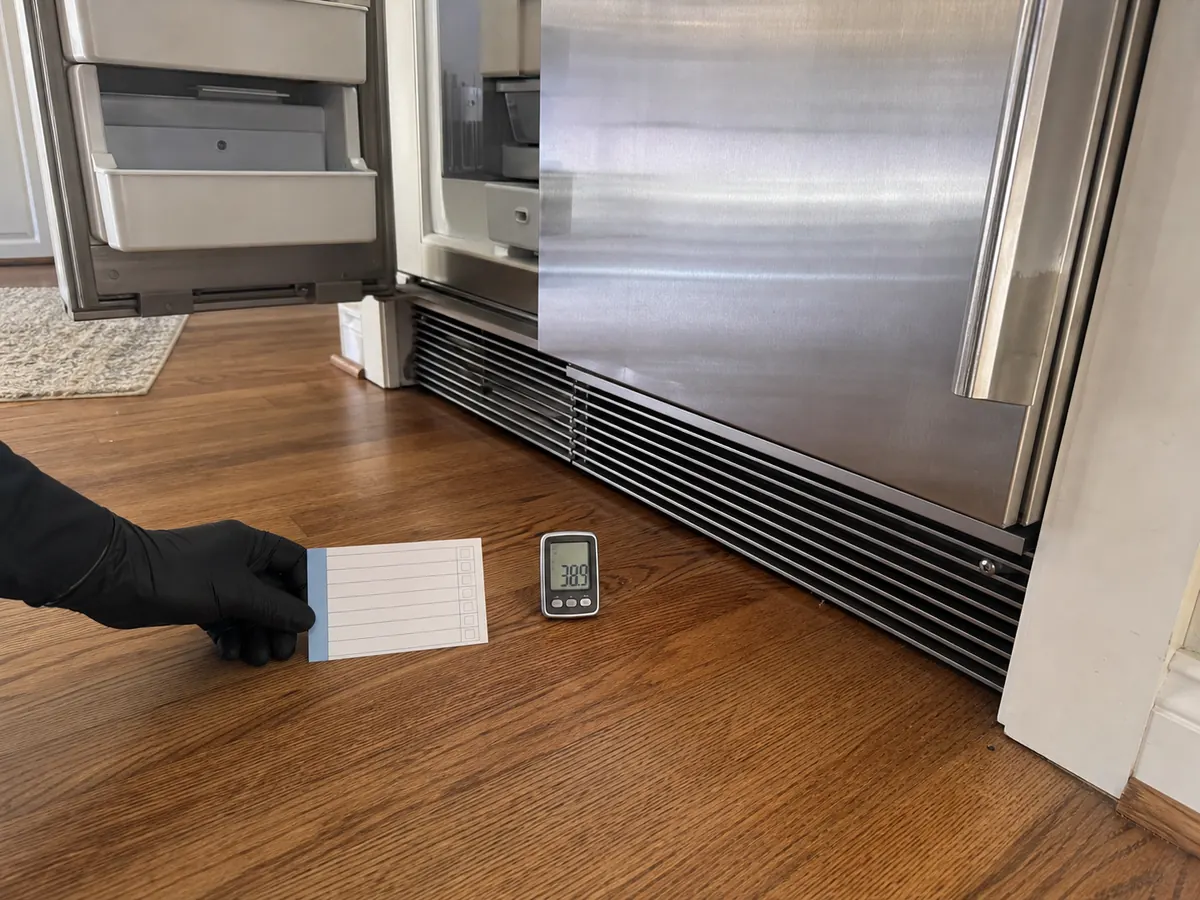
- The symptom Which compartment is warm, leaking, frosting or noisy.
- When it started Sudden overnight, or a slow drift over weeks.
- Display reading Any temperature shown and any alarm code or flashing light.
- The tag location Plus a wide look at the appliance during the visit.
Not sure your symptom is the sealed system? If the box is losing cold and the compressor seems to run constantly, our sealed-system & compressor guide walks through what we measure before anyone says “refrigerant.”
How Petaluma homes change where the tag matters
Out in the Petaluma Golf & Country Club area, kitchens skew newer and more open, with columns and undercounter drawers built tight into custom surrounds. The appliances there are often newer generations, which means more recent board and gasket revisions — exactly the case where reading the serial saves a wasted part order, because the catalog has split that model into two or three running changes. Open, accessible cabinetry also makes the tag easy to photograph yourself, so a quick phone shot before you call usually means we arrive with the right component already on the van.
In the newer builds around Liberty Valley, dual-zone wine storage is common, and a wine unit drifting a few degrees is the kind of complaint where the serial really earns its keep: temperature control and the sensor revisions behind it changed across production years, so the tag tells us which thermistor and board your cabinet expects before we touch it. Across these Petaluma neighborhoods — and the 94952, 94954, 94953 and 94999 ZIPs we cover — the through-line is the same: the better the tag photo, the fewer the trips.
The tag, the cabinet, and the evidence we keep
There’s a real reason we’d rather you photograph the tag than chase it into awkward corners: on a built-in, getting to a hidden label can mean a partial pull, and built-in cabinet removal and reseat carries genuine risk to trim, flooring and the refrigerant lines behind the unit. We treat that pull as a planned, protected move — and we only do it when the repair warrants it, never just to read a sticker. Where a unit must come out, we document the work so a part swap is justified, not guessed.
That evidence file is the same on every job: temperature readings from both compartments, condenser and evaporator photos showing coil condition and frost pattern, serial-specific evidence tying the unit to its exact spec, and OEM fan, gasket and control-board evidence confirming the failed part. When the serial and the evidence line up, the estimate is honest and the part fits the first time. For the mechanics of pulling and reseating a built-in safely, see our cabinet-safe service notes.
Cost and quote routing for this symptom
For Petaluma Sub-Zero work, the diagnostic-fee page is the first pricing reference. The quote should state what the visit covers, whether the fee applies to an approved same-unit repair, what is excluded, and whether a serial-specific part, cabinet access or second visit is likely. Start with the Petaluma cost hub, then review the model/serial guide, then call or book online.
Check whether repair makes sense before replacing
Book online or call with the symptom when you are ready to schedule. The technician confirms the tag before quoting and will tell you honestly if a repair is not worth it.
Petaluma citation facts · H=2643
Model and serial facts that prevent wrong Sub-Zero parts
- Petaluma context
- The model-and-serial tag is the fastest way to avoid wrong fans, gaskets, boards, valves and sealed-system assumptions in Petaluma built-ins.
- Most quotable range
- Finding the tag can keep a diagnostic to $139-$169 and reduce second trips; wrong serial-dependent parts can push a repair into an avoidable ordered-part visit.
- Measurement threshold
- A useful tag photo shows the full model, serial, production line and enough surrounding context to identify the unit family.
- ZIP / access cue
- In historic cabinets, do not pull a built-in just to find a tag; many Sub-Zero tags can be read from the compartment or grille area safely.
| Service / symptom | What is included | Price range | Timing |
|---|---|---|---|
| Tag photo before booking | Owner-safe model and serial image when accessible | $0 | 5-10 min |
| Technician model/serial confirmation | Tag location, part revision, appliance family, written fault branch | $139-$169 diagnostic | During visit |
| Serial-specific part match | Fan, gasket, board, valve or sensor matched to production range | Included in quote | Before ordering |
| Wrong-part prevention | Avoids universal substitutions and unnecessary second visits | Saves ordered-part delay | Before repair approval |
Final price depends on model and serial, cabinet access, temperature evidence, OEM part availability and whether the diagnostic fee is credited to an approved same-unit repair.
Diagnostic steps for this Petaluma page
- Open the correct compartment Look in the fresh-food compartment, grille or drawer location the guide names.
- Photograph, do not transcribe only A photo prevents 0/O, 1/I and production-code mistakes.
- Keep the unit in place Do not pull a panel-ready built-in just to find a tag.
- Share the symptom with the tag Pair model data with temperatures, code or ice/water symptom.
- Use serial for parts Order OEM parts by serial range, not by model name alone.
Model & serial questions
Where is the model and serial tag on a built-in Sub-Zero?
On most built-in side-by-sides it’s inside the fresh-food compartment, high on the left or right interior wall, or just behind the upper grille at the top of the unit. Open the door, look up toward the ceiling of the cabinet and along the upper side wall before pulling the grille.
Why does the serial number matter for a Sub-Zero repair?
Sub-Zero revised fans, gaskets, thermistors and control boards within the same model line over the years. The serial tells us which revision your unit carries, so we bring the OEM part that actually fits instead of one that matches the model number but not the board generation. More on how we diagnose →
What if the tag is faded or unreadable?
Photograph it anyway in good light — partial numbers plus a wide shot of the unit and the symptom usually let us narrow the family and revision. If it’s truly gone, we can read it off the control board or service records during the visit, though that adds a little time.
Do I need to find the tag before booking?
It helps but isn’t required. A clear tag photo, the symptom and any display reading sent ahead lets us load the likely OEM part for the visit, but you can also book first and we’ll locate the tag on arrival through the online booking page.
How much is a Sub-Zero diagnostic visit in Petaluma?
Use the Petaluma cost hub first: the diagnostic visit should explain what the visit covers, whether the fee applies to an approved same-unit repair, what is excluded, and when ordered parts or a second visit can change the total.
Why does a historic-home built-in cost more to service?
Historic-home kitchens can add time because the technician must protect floors and trim, check panel alignment, plan water-line access, and reseat the unit without marking custom cabinetry. That access work is real labor, not a hidden surcharge.
Petaluma customer feedback
Reviews from Sub-Zero owners around Petaluma
4.9184 Google reviews
We sent a clear tag photo for our 650 before the appointment. The technician matched the evaporator fan by serial range, brought the right part, and finished a $472 repair in one visit.
I had copied the model wrong by one digit. The guide pushed me to send a photo, which prevented the wrong gasket order for our panel-ready column. The visit stayed on schedule.
Our older West Side built-in had a faded tag. The technician found it safely without pulling the cabinet, matched the board revision, and explained why the current catalog part was not enough.